How to Install Ubuntu 10.04 over a LAN
Overview and Requirements
So I've volunteered to help Boulder Community Computers set up some automated Ubuntu OS installations over their local area network. Being as this is a large part of what I do professionally, this is something easy for me to do that should help them be more efficient. Their network layout is going to look something like this I think:
Internet
   ^
   |
Office LAN (private addresses)<-> Various workstations (DHCP from router)
   ^
   |
Multihomed Netboot Server
   ^
   |
OS Build Network (other private addresses)
   ^
   |
   <->Bare metal target machines needing  an OS (DHCP from Netboot Server)
OK, so let's talk about some of the goals/requirements:
- I want the build network to be separate from the office network. This will keep things simple, avoid DHCP collisions, prevent users from accidentally provisioning their workstations, and keep the intense network traffic of OS installation off the office LAN
- I want to mainly download cached objects from the Netboot server to the targets. I want to avoid downloading the OS over the Internet connection repeatedly.
- I don't want a lot of ongoing maintenance tasks
- I would like to be able to do a fully automatic hands-off installation
- I would also like to be able to boot into a live CD to test compatibility
- I would like to be able to do an interactive custom install
- I do want internet access from the OS Build Network (mostly for NTP, but it's just handy in general)
So overall, Ubuntu can meet all of these goals easily. Here are the details.
Setting up the Multihomed Network Install Server
So we want an Ubuntu server machine with two network interfaces (multihomed) to act as our network install server. This machine will provide DHCP/PXE, TFTP, NFS, HTTP, and HTTP proxy services to the target machines. It will also act as their default gateway, routing their traffic from the OS Build Network out to the Office LAN and then out onto the Internet and back. Here's how we get this server installed and configured.
Install a basic Ubuntu 10.04 Server amd64 host
I used a VirtualBox VM for this while testing this setup, and we will probably use that in their "production" environment as well. If you use a physical computer, make sure it has 2 network connections. You can select "OpenSSH Server" during the install or install openssh-server later. Once the OS is up and running, we need to configure both of the network interfaces. We'll be using RFC 1918 private addresses for both. In this case we have a 10.0.0.0/8 network as eth0 which is the Office LAN and a 192.168.0.0/16 network as eth1 which is the OS Build Network. The Office LAN is your typical home or office type network where a router is serving private IP addresses over DHCP and providing Internet access. In VirtualBox I set the first interface to be a bridged interface eth0 and the second interface to an internal only interface eth1. To do this we edit /etc/network/interfaces as root as follows.
A quick note about code samples and long lines
Several of the code samples in this article require very long lines. These don't display well on the web, but they are displayed using a CSS overflow horizontal scrollbar. Hopefully they are easy enough to read, copy, and paste.
# This file describes the network interfaces available on your system
# and how to activate them. For more information, see interfaces(5).

# The loopback network interface
auto lo
iface lo inet loopback

# The primary network interface
auto eth0
iface eth0 inet dhcp

# The internal build network for OS installation
auto eth1
iface eth1 inet static
address 192.168.8.1
netmask 255.255.255.0
After that edit, activate the config with (as root) ifdown eth1; ifup eth1. Verify it's working by pinging both of your IP addresses (the 10.X.X.X one and the 192.168.X.X one).
Install and Configure PXE Boot Services
Install dnsmasq via apt-get install dnsmasq. Then as root do a mkdir /var/lib/tftpboot. Edit /etc/dnsmasq.conf to look as follows.
interface=eth1
dhcp-range=192.168.8.100,192.168.8.254,12h
dhcp-boot=pxelinux.0
enable-tftp
tftp-root=/var/lib/tftpboot/
Restart it with service dnsmasq restart
The next big step is to make the Debian Installer available as a PXE boot image. We're basically following this article here, except we're doing Ubuntu Lucid 10.04 instead of Feisty. Do the following.
cd /var/lib/tftpboot
sudo wget http://archive.ubuntu.com/ubuntu/dists/lucid/main/installer-i386/current/images/netboot/netboot.tar.gz
sudo tar -xzvf netboot.tar.gz
sudo rm netboot.tar.gz
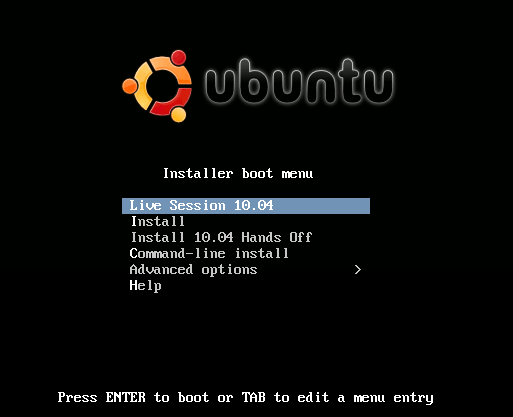
OK, at this point we should be ready to boot our first test target machine into the Debian Installer network boot service OS. PXE boot a machine on the OS Build Network (again, I used a VirtualBox VM). You may have to fit a key like F12 to instruct the machine to boot from a network card. I have to hit F12 then "l" to boot from the LAN on my VirtualBox VM. If all is well, you should see a lovely Ubuntu installer menu like this (you won't have the menu items containing "10.04" yet, but we'll add them later).
So now we can use this to install Ubuntu onto the target. Well, almost. We don't have Internet access from our OS Build Network working yet, so let's get that going.
Setting up Routing to the Internet
We want to allow our target machines to connect to the Internet, which means we will configure our Net Boot server as a very basic router and NAT firewall. This is often called Internet Connection Sharing when used for this simple purpose. We're basically following Internet Connection Sharing Setup docs from the Ubuntu community wiki. As root, add net.ipv4.ip_forward=1 to /etc/sysctl.conf. Then run these commands.
sudo iptables -A FORWARD -i eth0 -o eth1 -s 192.168.0.0/16 -m conntrack  --ctstate NEW -j ACCEPT
sudo iptables -A FORWARD -m conntrack --ctstate ESTABLISHED,RELATED -j ACCEPT
sudo iptables -A POSTROUTING -t nat -j MASQUERADE
sudo iptables-save | sudo tee /etc/iptables.sav
sudo sh -c "echo 1 > /proc/sys/net/ipv4/ip_forward"
Now add iptables-restore < /etc/iptables.sav to /etc/rc.local as root just above the exit 0 line. This will get us going again when we reboot.
Now you should be able to PXE boot a target, select "Install" from the menu and do an Ubuntu installation. However, it's going to be a normal install over the Internet, which is fine for doing one or two boxes, but since we want to crank these out en masse, we'll want to cache the bits and grab them locally.
Caching the Ubuntu Packages with apt-cacher-ng
I tried both squid and apt-cacher for a solution to locally cache the bulk of the Ubuntu binary package payload, but neither worked very well. apt-cacher-ng seems to do exactly what we want and nothing more with no configuration. install apt-cacher-ng. This "just works" with no setup. After it's installed, if you PXE boot a target, select "Install" and go through the interactive install, when prompted for a proxy, enter http://192.168.8.1:3142. This is the OS Build Network IP of the Net Boot server and the apt-cacher-ng proxy port. Now all your packages will be cached on the OS Boot Server. The first install will download them from the Internet. Subsequent installs will get them from the local cache and thus be much much faster and more efficient.
Hands-off Automatic OS Installation
OK, we now have network based OS installs working, but since we're planning on doing many of these, we want to fully automate this. To do that, we'll use a preseed file to configure the Debian Installer to not ask any questions. Configure a file at /var/lib/tftpboot/bococo.seed with the the content linked here: bococo.seed.
Now we'll add a new item to the PXE menu to trigger a hands-off automated OS install. Edit /var/lib/tftpboot/ubuntu-installer/i386/boot-screens/text.cfg and add this entry.
label install-10.04-hands-off
        menu label ^Install 10.04 Hands Off
        kernel ubuntu-installer/i386/linux
        append vga=normal initrd=ubuntu-installer/i386/initrd.gz locale=en_US.UTF-8 debian-installer/keymap=us auto hostname=bococo preseed/url=http://192.168.8.1/bococo.seed -- quiet
In order to get that file over HTTP, we'll server it up with the nginx web server. install nginx via apt-get install nginx. Then we can edit /etc/nginx/sites-enabled/default and change location / block to set the new document root to the tftpboot directory so it looks like this.
        location / {
                root   /var/lib/tftpboot;
                index  index.html index.htm;
        }
Restart nginx via service nginx restart. Now we should be able to PXE boot the target and select the "Install 10.04 Hands Off" option and the entire thing should happen automatically.
Network Booting into the Live Image
One final bit of utility functionality we want to provide is a network bootable live Ubuntu image. This will be handy for testing hardware compatibility, performance, etc. First we'll download the primary Ubuntu Desktop CD image and make it available over NFS. Do the following as root.
apt-get install nfs-kernel-server
cd /var/opt
wget 'http://ubuntu.cs.utah.edu/releases/lucid/ubuntu-10.04-desktop-i386.iso'
mkdir /var/lib/tftpboot/ubuntu-10.04-desktop-i386
echo /var/opt/ubuntu-10.04-desktop-i386.iso /var/lib/tftpboot/ubuntu-10.04-desktop-i386 auto ro,loop 0 0 >> /etc/fstab
mount /var/lib/tftpboot/ubuntu-10.04-desktop-i386
echo "/var/lib/tftpboot/ubuntu-10.04-desktop-i386 *(ro,sync,no_subtree_check)" >> /etc/exports
service nfs-kernel-server restart
Now add another entry to your PXE menu for the live Session. I also like to move the menu default option to the live session, so my final /var/lib/tftpboot/ubuntu-installer/i386/boot-screens/text.cfg looks like this:
default install-10.04-hands-off
label live
        menu label ^Live Session 10.04
        menu default
        kernel ubuntu-10.04-desktop-i386/casper/vmlinuz
        append initrd=ubuntu-10.04-desktop-i386/casper/initrd.lz boot=casper netboot=nfs nfsroot=192.168.8.1:/var/lib/tftpboot/ubuntu-10.04-desktop-i386          -- quiet
label install
        menu label ^Install
        kernel ubuntu-installer/i386/linux
        append vga=normal initrd=ubuntu-installer/i386/initrd.gz -- quiet
label install-10.04-hands-off
        menu label ^Install 10.04 Hands Off
        kernel ubuntu-installer/i386/linux
        append vga=normal initrd=ubuntu-installer/i386/initrd.gz locale=en_US.UTF-8 debian-installer/keymap=us auto hostname=bococo preseed/url=http://192.168.8.1/bococo.seed -- quiet
label cli
        menu label ^Command-line install
        kernel ubuntu-installer/i386/linux
        append tasks=standard pkgsel/language-pack-patterns= pkgsel/install-language-support=falseac vga=normal initrd=ubuntu-installer/i386/initrd.gz -- quiet
And that's it! We can now netbook into a live session, an interactive install, or a fully automated install.
References
- How-To: Unattended Ubuntu Deployment over Network -- page 4 -- PXELinux
- Ubuntu Internet Connection Sharing
- Debian Installer section on Automatic Installation
- Sample preseed file for Ubuntu 10.04
- Info on apt-cacher-ng
Acknowledgements
Thanks to the authors of the above reference web pages and Nick Flores for collaborating on this.